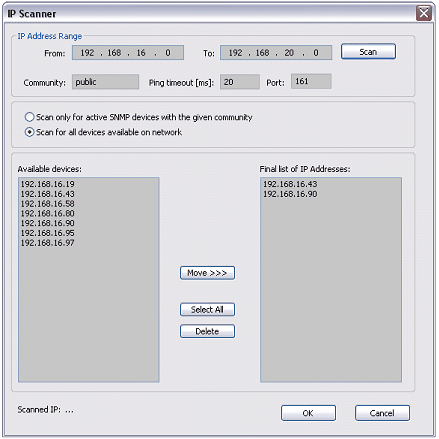
To open IP Scanner choose Tools à IP Scanner from main menu.

IP Scanner enables to scan the network in given range and find connected SNMP devices.

|
After scanning, IP addresses of all found and selected devices are visible on Device panel. To set the IP address of device, just select the address from the list.

How to use IP scanner?
First you need to set scanning parameters :
| · | IP Range
|
| · | Community
|
| · | Ping timeout
|
| · | Port
|
As default values are used public community, ping timeout = 20ms and standard SNMP port 161.
Than, choose what type of devices do you want to scanning for:

|
| - | You can choose to scan only for active SNMP devices with the given community.
|
| - | The second possibility, scanner will find all devices connected to network and not only SNMP devices. In this case, the given community is ignored.
|
Now you can press
The list left contains the currently scanned and found IP addresses. This list is always cleared after you press Scan. The list box right contains the final list of IP addresses. This is the list what you can see on device panel. You must manually create this list with moving the addresses from the left list to this final list. To learn to work with this lists read following notes :
| - | First you need to select the addresses and than you can operate with them (move or delete)
|
| - | To select more items hold <Ctrl> or <Shift> and use mouse button or standard arrow keys
|
| - | To select all IP addresses click to the list and press |
| - | To move the selected addresses from the left list to the final list, press |
| - | To delete selected devices press |
Final, you need to confirm the changes pressing
Send feedback on this topic.
Copyright © 2004-2013, SAE - Automation, s.r.o. (Ltd.), All rights reserved.